
How to use Trello for project management: the 5-step guide
Trello makes project management a breeze! Learn more in our 5-step guide to mastering projects with Trello.

Trello lends itself to an extraordinarily broad range of use cases. From planning meal prep to organising work tasks and even improving the dating experience, there really is something for everyone in this kanban board-style tool. Such is Trello’s power and flexibility that it’s become one of the most popular organisational tools available, with more than 50 million registered users. It’s therefore no surprise that Trello is increasingly used within the project management setting.
As a listmaking application, Trello is perfectly positioned to be used by project management teams to plan and track work. In a role where organisation and time management are everything, it’s crucial to have the right planning and tracking tools to help projects run as smoothly as possible. Ready to get started? Here’s how you can use Trello for project management in just five simple steps.
As a listmaking application, Trello is perfectly positioned to be used by project management teams to plan and track work. In a role where organisation and time management are everything, it’s crucial to have the right planning and tracking tools to help projects run as smoothly as possible. Ready to get started? Here’s how you can use Trello for project management in just five simple steps.
1. Personalise: Customise your Trello board for your business, project and team
When you first create your Trello board, it will look something like this:

It’s a blank canvas that can be customised in a number of ways, from the background and colour scheme to the different columns that make up your project workflow. You can even use and create Trello templates to help achieve the style you want.
The first thing to do when setting up your Trello board is to consider how to personalise it. You should think about not just the visuals of the board, but the project organisation as a whole. What are the stages that make up a project’s progression? What needs to be done to move tasks forward, and when? Who is responsible for advancing the project? What are the expectations around deliverables and deadlines?
Proper planning and organisation of your Trello board will help to address these questions and give you and your team visibility over the whole project lifecycle.
Proper planning and organisation of your Trello board will help to address these questions and give you and your team visibility over the whole project lifecycle.
Follow these steps to ensure your board gets off to the best possible start:
- Name your board something memorable and representative of the project. Trello users juggling multiple projects need to be able to quickly identify which board relates to their project.
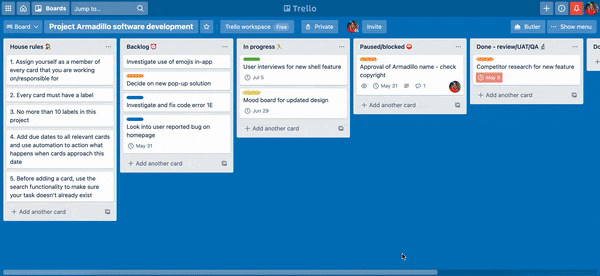
- Align your project processes and workflow to the lists (columns) in your board. Go beyond the standard “To do”, “In process” and “Done” kanban setup and tailor your Trello board to your project. For example, your board could feature a “House rules” or “General information” list to provide context and guidance on the Trello project. A “Paused” or “Blocked” section allows you to triage tasks without removing them from the board entirely, while you can separate your “Done” lists to differentiate between tasks which are completed and ready for final review and testing, and those which are completed and live.
- If your team works according to Agile methodologies, or your project is large and complex, you might want to refresh your board for each sprint. If your project is smaller and your team works closely together, one overarching board may be sufficient for the whole project.

A customised Trello project management board will better reflect your project and the way your team approaches work, so spend time making sure you get this stage right.
👉 Tip: For more insights on what makes for successful project management, take a look at this article featuring top tips from tech leaders.
2. Plan: Map out your project, appoint stakeholders and define processes
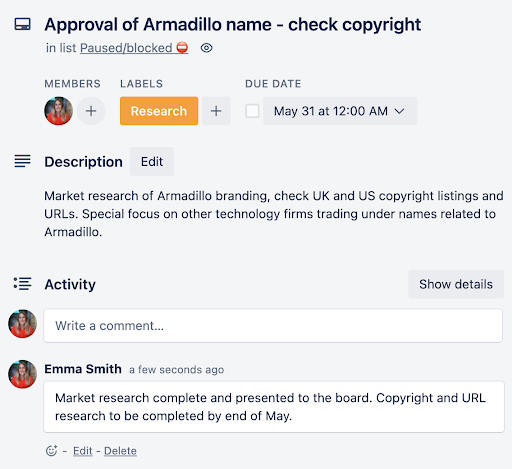
Once you’ve improved the look and feel of your Trello board, it’s time to map out your project and add cards to your board. A general rule of thumb is to create one card per task, however if a task requires multiple actions - or perhaps several related tasks can be grouped into one - you can flex your cards accordingly. When you’re adding tasks, provide as much detail as possible so that even someone not involved in that stage of the project will understand what’s going on.
It’s a good idea to have your board organised, and your project mapped out before you invite team members to join. Once you’re happy with how your project board looks, invite all relevant stakeholders and participants to join the board. Host a session to explain the rules, processes and expectations of the project workflow and Trello board. A good resource to share is this Trello tips and tricks blog, which is helpful for both new and experienced users alike.
You can then start assigning tasks to specific people, confirming deadlines and encouraging team members to add to tasks (and even add their own to the board, depending on your house rules).
3. Implement: Use labels, track your time and make the most of Butler
When your project is underway and your team is working through tasks, it’s crucial that you keep your Trello board up to date. This is when your house rules come into play. You should determine who is responsible for updating and moving cards when tasks are worked on, and there are also tools and functions that can help to streamline your project.
Labels for Trello
Use labels to categorise your tasks. Set a limit on the number of labels each project can have, and make sure every task that’s added has at least one corresponding label. You can then search for tasks within your project by label, as well as get a quick visual overview of the balance of tasks per category across your project. For instance, if you notice your board increasingly has more bugs and fewer content tasks, you can reallocate resources before you reach a bottleneck.

Time Tracking in Trello
For project managers, time is money. You’ll want an overview of not just the progress of your team’s tasks, but also how that progress looks in terms of hours and budget. To help with this, use the Time Tracking and Reporting for Trello Power-Up. It lets users log time against Trello cards to give the team and project manager a quick snapshot of how much time has been spent on tasks. You can then export the data to Microsoft Excel to perform a more in-depth analysis or export it to a PDF for easier sharing with stakeholders.
For another helpful time management tool, try the Due Next Power-Up. For this to be most effective, your team will need to accurately assign dates to their Trello cards. Once your cards are dated, Due Next will help you schedule, plan and forecast work, showing you upcoming and overdue tasks in Trello. For project managers working to tight deadlines, this provides extremely useful insight.
Not sure what Trello Power-Ups are or how you can use them? Check out our blog to learn everything you need to know.
Butler on Trello
For powerful in-built Trello automation, look no further than Butler. Located on the top right toolbar of your Trello board, Butler is a functionality that allows you to create buttons, schedule commands, and implement rules, helping your board to keep itself tidy even when you’re not overseeing it. There’s a wide range of things that Butler can help with, so don’t be afraid to experiment! Below is an example of setting up a simple rule automation using Butler:
4. Maintain: Hold regular housekeeping sessions
Board organisation is everything when using Trello for project management. Regular maintenance will make your project run more smoothly and help to prevent your board from becoming cluttered and outdated. Schedule dedicated time each week to tidy your board, running through the following:
- Ensure tasks are clear, make sense and can be understood by all members. If a card doesn’t make sense, flag it to the reporter to update.
- Make sure all relevant fields are filled in, including the due date, members, description and activity.
- Assess how many labels your board is using. Too many and it will be cluttered and hard to filter; too few and tasks won’t be adequately categorised.
- Check what progress has been made on tasks and progress cards, along with lists as required.
- Review any queries and resolve roadblocks.
- Delete any cards which are no longer relevant to your project.
Note that while Trello is an effective tool, it shouldn’t replace regular project meetings and stand-ups. Instead, use Trello to enhance these sessions and allow you to focus more time on questions and work discussion rather than task planning.
5. Improve: Integrate Trello with other workplace tools for maximum productivity
Trello can be integrated with a number of different solutions and products. Its featured integrations include Slack, Jira and Adobe XD, with dozens of others such as Confluence Cloud, Salesforce, GitHub, Aha! and Google Drive. Look at the tools your project and development teams are using and consider how you can integrate these into your Trello processes. Doing so will save your team time and reduce context-switching, ultimately improving productivity.
Bonus tip: Got a big team? Wondering how to manage multiple projects in Trello? Give yourself a helping hand with the Daily Updates Power-Up. This tool automatically asks each team member of a board three questions each day, feeding back the responses to give a team view of work completed and any issues. Whether you use it in place of or alongside a recurring stand-up, it’s a great way to keep team members accountable and help project managers understand what’s going on across the board.
You’re ready to start using Trello for project management
If you’ve made it this far, congratulations! You’re all set to improve your project management with Trello. If you’re still getting to grips with the product, bookmark this handy blog on the most useful keyboard shortcuts for Trello and start creating some test boards and cards to test your skills. All that’s left to do now is start mapping out your project!
Take project management further with Trello Power-Ups
Get more done faster with less effort. Get a 14-day trial of our Power-Ups and see how much you can do!