How to recreate content in Cloud with Smart Designer
Share on socials
How to recreate content in Cloud with Smart Designer

Jump to Section
Jump to section
What is Smart Designer?
Why use Smart Designer?
How to use Smart Designer
Example layouts using Smart Designer
Tips for creating better pages in Cloud
Has Confluence migration got you feeling lost?
Daunted by the thought of rebuilding your migrated content in Confluence Cloud? With Smart Designer, it's quick, easy, and fun.
When you move your content from Confluence Data Center (DC) to Cloud, you'll notice some differences in the way the editor (and its macros) work. You can leave your pages in Confluence's legacy editor indefinitely if you choose, but eventually, you'll probably want to update your content or create new pages to take advantage of features exclusive to Cloud.
Learning a new system can be daunting, but if you use Mosaic: Content Formatting Macros & Templates, you're in luck. With Smart Designer, you can create rich page layouts in Confluence Cloud without writing any code.
What is Smart Designer?
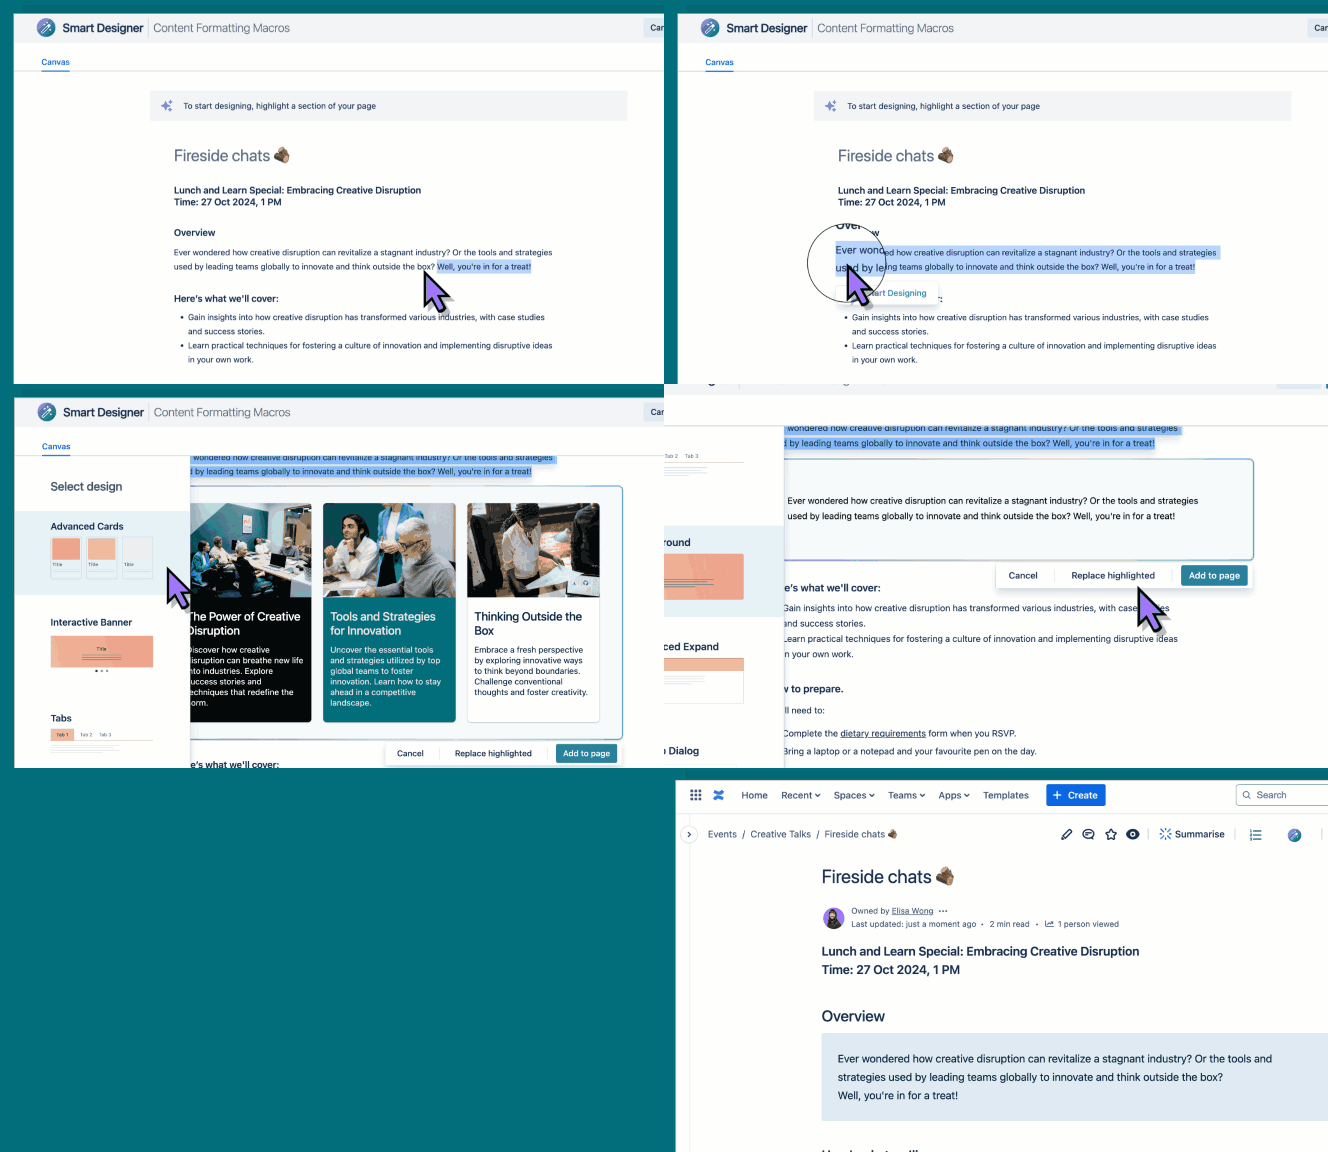
Smart Designer is Mosaic’s built‑in design wizard, letting you turn a wall of text into an engaging, visual page in seconds. Simply highlight your text, choose one of the design options from the sidebar, and click to add it to your page.

Smart Designer makes it easy to turn text into engaging visuals
Why use Smart Designer?
- Create engaging pages in seconds: Smart Designer lets you instantly preview page updates as you edit, meaning you don't have to publish your page to see the results. By removing the guesswork, you spend less time on fiddly tweaks and more time on tasks that matter.
- Anyone can use it: Whether you're a seasoned Confluence pro or a new user who's learning the ropes, anyone can create engaging pages with Smart Designer. You don't need to know HTML or CSS, and you don't need a degree in design either.
- It's intuitive and fun: While building content from scratch can be slow and tedious, creating pages with Smart Designer is a genuinely satisfying experience.
How to use Smart Designer
- In edit mode, type “/Smart Designer” and select the macro, or open a published page and click the Smart Designer icon. This will open the Smart Designer canvas.
- Highlight your chosen text - at least 10 words - and click “Start Designing”.
- Browse the available design options in the sidebar. You can click each one to see how your highlighted text looks. You can choose from:
- Advanced Cards
- Interactive Banner
- Tabs
- Background
- Advanced Expand
- Pop‑up Dialog
- When you find a format you like, click either “Add to page” (which keeps your original text and inserts the macro after it) or “Replace highlighted” (which replaces the text with the new macro).
- Repeat on other sections of your page as needed.
- When done, click “Save” in the Smart Designer canvas, then “Update”/“Publish” your page.
💡 Pro tip: Smart Designer creates a temporary copy of your Confluence page, so you can play around with the macros without fear of losing your original content. To save your page as a new copy, click the arrow beside “Save”, followed by “Create child page”.
How to recreate popular layouts in Cloud with Smart Designer
With Smart Designer, you can rebuild the look of many common DC pages. Here's how to build a few popular use cases in Cloud (and the macros they use):
Product landing page
A polished landing page often has a big header, feature highlights, and calls to action.
- Start with an Interactive Banner or Background as the hero to announce the product.
- Highlight a list of features and use Smart Designer to convert it to an Advanced Cards grid (with each card showing a feature image and text).
- You can add Background sections between content blocks for visual interest (e.g. alternating coloured sections).
- Optionally, use Tabs to break content into categories (e.g., "Features," "Pricing," "Resources").

Team hub
A team hub (or homepage) is a great way to introduce the team and link to resources.
- Begin with an Interactive Banner as a header with a team motto.
- Advanced Cards are a useful way to feature team members or sub‑teams (photo + bio card for each person), or to link to other team resources.
- Background blocks can highlight other important sections (e.g. team mission or announcements).

Knowledge base homepage
A knowledge base needs to present information and links to resources in an interactive way.
- Add an Interactive Banner or Background to the top of your page as a welcome banner for users.
- To link to other related pages, you can add some Advanced Cards to present them in a visual way.
- If your knowledge base features FAQs, it's a good idea to use a space-saving macro. Collapse individual questions and answers with Advanced Expand, or if you have a lot of FAQs, organise them into related groups using Tabs.

Across all these examples, the key is to highlight your content and let Smart Designer suggest the best format.
Once you're finished building your structure in Smart Designer, you can mix additional macros (from Mosaic and Confluence) to create an even more advanced page layout. For instance:
- Add Buttons for less visually demanding links
- Nest a table within a Background macro to highlight statistics
- Insert Layouts to add more white space to your page
👉 Did you know? Mosaic also includes built‑in templates for all these use cases as even quicker starting points:
Tips for creating better Confluence pages
- Use templates as inspiration: Mosaic Cloud has dozens of built‑in templates (OKRs, Roadmaps, Teams, FAQs, and more). View them for inspiration, or use them as a springboard. You can always expand upon a template with the help of Smart Designer. Learn more: How to use templates to get started quickly in Cloud
- Preview often: Always preview the macro in Smart Designer before inserting. You can click through each option to see real-time results. If you don't like the first style, just click another - your original text isn't lost until you click to replace it.
- Iterate and refine: After inserting macros, you can still edit the content or style (colours, icons, etc.) by editing the macro placeholder on the page. Cloud macros are much easier to tweak than DC's stylesheet approach, and give you a preview of your changes before you set them live.
With Smart Designer, you can recreate (and improve on) your old page designs in Confluence Cloud. The shift from CSS and HTML to a guided, visual approach may take a little experimentation at first, but soon you'll be building engaging, branded Confluence pages without touching a line of code.

Try Smart Designer free
Take the stress out of creating pages in Confluence Cloud. Get Smart Designer with your 30-day free trial of Mosaic.
Has Confluence migration got you feeling lost?
Written by


