
How to configure settings in Forms for Confluence Cloud
Share on socials
How to configure settings in Forms for Confluence Cloud


Jump to Section
Jump to section
Email notifications (all forms)
Email notifications (specific forms)
Allow anonymous responses
Allow multiple submissions from the same user
There might be more to form settings than you think. Take a look at how they can level up your forms.
So you want to make your forms work harder? Perhaps you want to allow anonymous submissions. Maybe time’s a-tickin’ and it’d be useful to get an email notification every time your form gets a response. Or, maybe you want users to respond to the same form questions multiple times over a period of time. Well, you can do all that through your form settings in Forms for Confluence.
This is a guide to using Forms for Confluence - which is free to use for up to 10 users. Get access to all that Forms for Confluence has to offer now.
Turn email notifications on or off - for all forms
- Access the Forms homepage by navigating to the Apps tab, then Forms for Confluence.
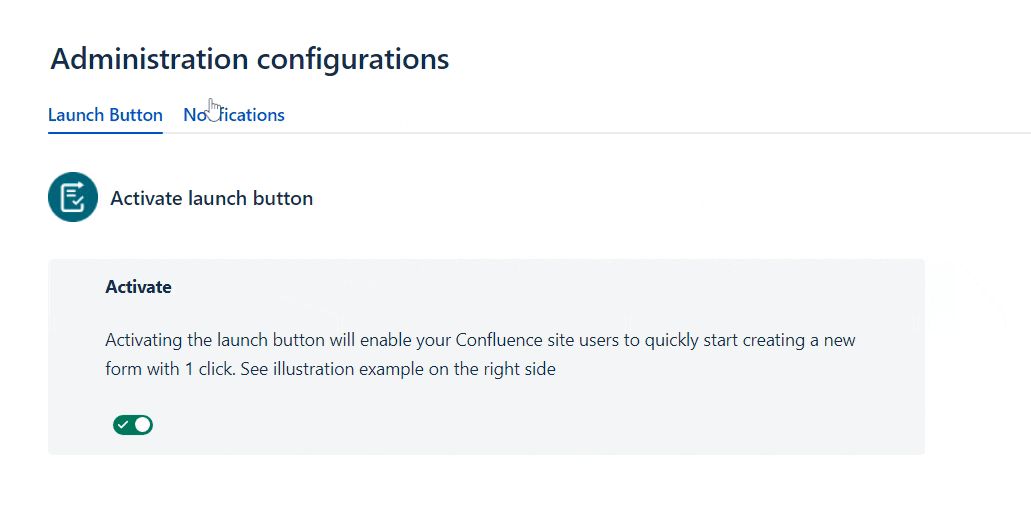
- Click the Administration button in the top right of the Form Builder. This will take you to the Administration configurations page.
- Click Notifications. Under Enable email notifications, click to choose whether notifications are on (a tick icon will show), or off (a cross icon will show).
Configure email notifications - for specific forms
Only want email notifications for certain forms? Here’s how to set that up.
- Go to the form you want to change submission notifications for. Click the pencil Edit icon to access Form Builder.
- Click the Configure forms icon at the top right of your form. This will bring up the Form configuration box.
- Click the Email notifications tab. Click to toggle whether email notifications are on (a tick icon will show), or off (a cross icon will show).
- Click Save in the bottom right corner to confirm your new form settings.
Allow anonymous responses
There may be times when you want users to be able to respond to your form without revealing who they are, particularly when it comes to asking for a user’s opinions. This could be because you want to encourage honesty without fear of repercussions at work, protect the privacy of respondents, or to aid the collection of unbiased data.
Here’s how to configure Forms for Confluence form settings to allow anonymous submissions:
1. Navigate to the form you want to work with. In Form Builder, click the Configure forms icon in the top right.
2. In the Form configuration menu, click the Advanced tab. You will now see two configuration options relating to anonymous submissions:
Allow anonymous form submissions - select this option by ticking the box if you want respondents to be able to choose between sharing their identity or remaining anonymous
Make all submissions anonymous - select this option by ticking the box if you want all submissions to be anonymous as standard

3. Follow the above steps at any time if you want to no longer accept anonymous submissions, this time unticking the boxes that allow anonymous submissions.
Allow multiple submissions from the same user
Though data can be skewed (cue disastrous results!) by allowing individual users to respond to the same form multiple times, there are some instances where it can be advantageous:
Comparative analysis - analyse trends of how user opinions change or stay the same over time
Additional ideas and feedback - users might think of ideas they want to share after submitting the form the first time. And if you’re using an ongoing form for customer feedback or complaints, you’ll need to allow returning customers to let you know how they feel
User experience testing - get users’ feedback after each interaction or task completed
Now you know the why, let’s get on to the how.
- Select the form you want to work with. In Form Builder, click the Configure forms icon in the top right.
- In the Form configuration menu, click the Advanced tab.
- You’ll see a section titled Multiple submissions. Here there is the option to prevent users from submitting this form multiple times. Keep this option box unticked if you want to allow multiple submissions.

Alternatively, tick this box if you don’t want the same user to be able to respond to your form more than once.
And there you go! Now you can configure your form settings to suit whatever purpose your form serves.
Create forms that are flexible to your needs with a 30-day free trial of Forms for Confluence.
Related Content
Read more


Written by
Related Content
Read more