Creating sections in Confluence: how to tidy up your pages
Share on socials
Creating sections in Confluence: how to tidy up your pages


Ways to create sections
Ways to create sections
TL;DR
1. Divider
2. Layouts
3. Expand
4. Tabs
5. Background
It’s time to take control of your Confluence pages! Learn five ways to add more structure and style with sections in Confluence.
If your content is looking a little cluttered, learning how to improve your Confluence page structure is the perfect place to start. We have outlined five easy ways to create clear, engaging sections on your pages, along with exactly when to use each one.
Confluence Cloud comes with limited native structuring elements. While we've included a few to help you structure your pages for no extra cost, we also cover macros included with Mosaic for Confluence that really help you level up your style and structure at the same time.
TL;DR: Creating sections in Confluence
Here's a quick summary of the best ways to structure your pages for maximum engagement:
- Divider macro: Use /divider to add a simple horizontal line that breaks up intimidating walls of text.
- Layout macros: Use /layouts to organise your content into professional, horizontal columns.
- Tabs macro: Use /tabs (via Mosaic for Confluence to group related content into interactive, clickable categories.
- Background macro: Use /background (via Mosaic) to highlight essential sections with your custom brand colours.
- Expand macro: Use /expand to tuck heavy text into collapsible sections (or upgrade to Advanced Expand included with Mosaic to nest rich macros and add branding).
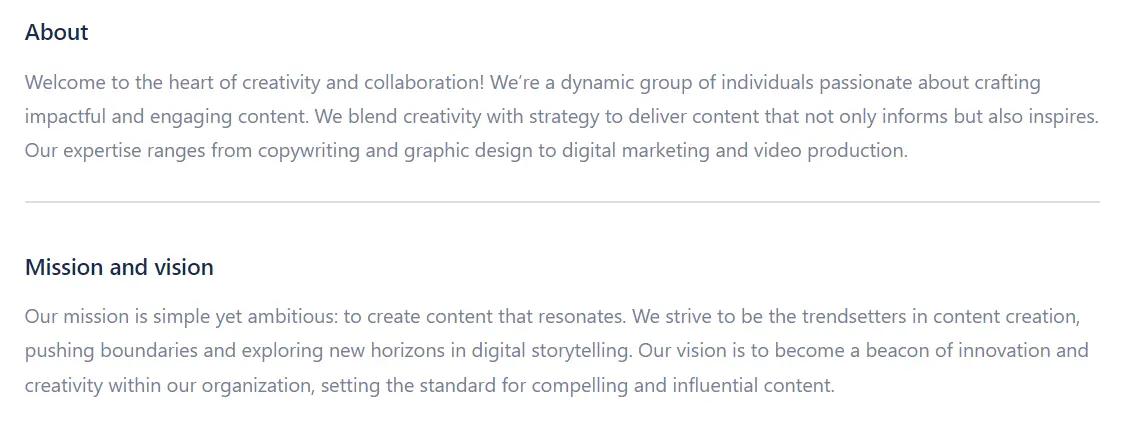
Why create sections in Confluence?
Dividing your Confluence page into sections is a simple but highly effective way to keep your content neat. Grouping related information logically helps your team move from messy thinking to meaningful outcomes.
Organising your content this way also:
- Improves readability: Users can scan the page and find what they need much faster.
- Boosts engagement: Well-structured pages help readers absorb and remember key messages.
- Elevate your brand: Professional-looking documentation improves how readers perceive your brand.
Overall, creating sections is a brilliant way to make your pages stand out and ensure your message is understood.
How to create sections in Confluence Cloud
Option 1: Divider
Best for: Splitting walls of text into smaller, simple sections
The most straightforward way to create sections in Confluence is with dividers. The Divider element adds a horizontal line to separate your content.
White in edit mode, simply type /divider on your page to instantly insert a horizontal line.
Dividers are really handy for quickly and easily separating unrelated points. They also introduce much-needed whitespace to your page, breaking down intimidating walls of text into more digestible, reader-friendly chunks.
Option 2: Confluence layouts
Best for: Creating structured columns for knowledge bases and company dashboards.
Layouts are a native Confluence feature that lets you arrange your content across columns on a page. They are fantastic for building professional-looking Confluence knowledge bases, landing pages, or documentation.
To use Layouts, type /layouts on your Confluence page and click on the Layouts macro in the dropdown menu.
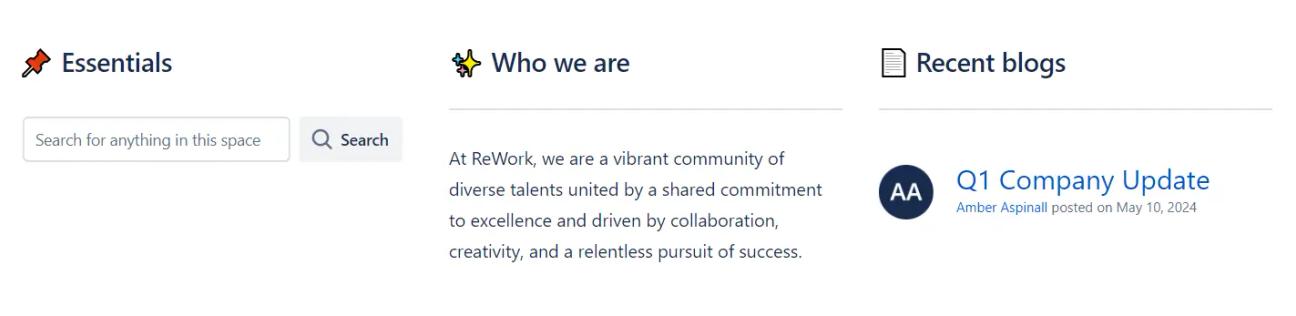
Layouts come in a few flavours: you can create two or three columns, and adjust the width so one column is larger than the others. You can even nest other macros inside these sections, such as a search box or a Divider macro, to further improve your page structure.

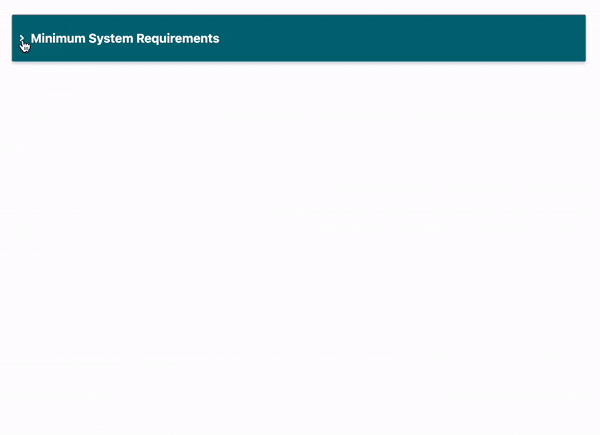
Option 3: Expand macro
Best for: Organising heavy text into space-saving, collapsible sections.
The Expand macro is a native Confluence element that creates a collapsible section users can click to reveal (or hide) information. It's ideal for saving space and making your pages less overwhelming.
You can create an Expand on your page by typing /expand on your Confluence page, then select the Expand macro in the dropdown menu.

Confluence’s built-in Expand macro lacks visual customisation, and you're strictly limited by what you can put inside the container (essentially, just text).
Limitations of the Expand macro:
- No customisation
- Doesn't stand out on the page; easy to miss
- Can't nest tables or other macros inside
An alternative to the Expand macro
If you’d like to create highly visible collapsible sections that can hold rich content, like tables or other nested macros, you should try the Advanced Expand macro included with Mosaic for Confluence.
Just install Mosaic and type /advanced expand on your Confluence page, then follow the editor to create your expanding section.
Advanced Expand allows more advanced customisation and supports nested macros
Option 4: Tabs macro
Best for: Categorising complex information into neat, interactive sections without extending the page length.
Much like the Expand and Advanced Expand macros, tabs create engaging layouts that take up minimal space. However, while Expand macros open vertically, Confluence tabs sit side by side, making them the ultimate space-saving solution.
To use tabs in Confluence, install Mosaic for Confluence (you can try it free) and then type /tabs on your Confluence page.
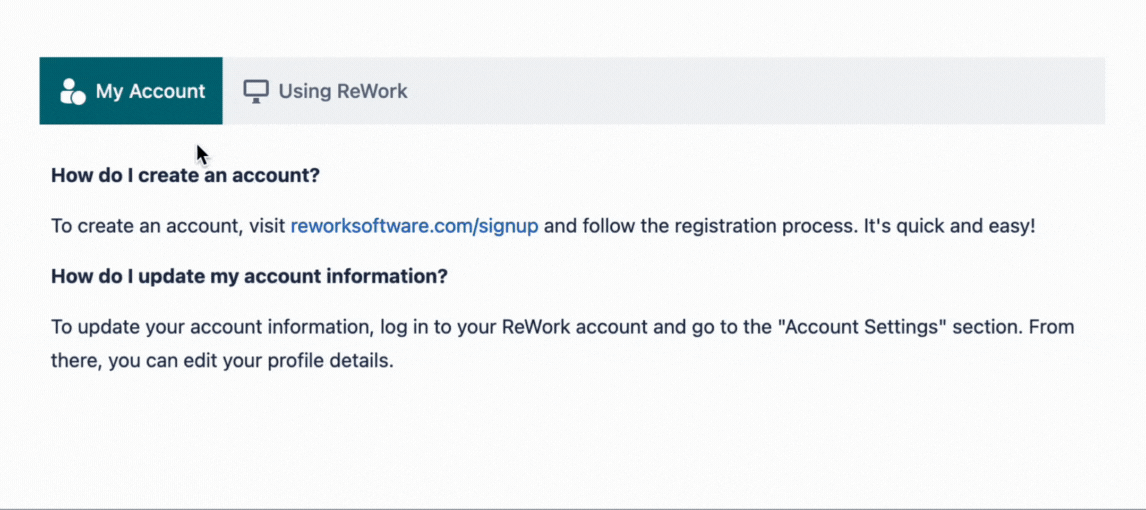
Tabs are the ideal way to organise information into neat, interactive sections. They're perfect for structuring Frequently Asked Questions (FAQs) or for creating an event page with tabs that show the schedule for each day.
Option 5: Background macro
Best for: Creating striking, colourful sections that demand attention.
If you're looking for a way to highlight text in Confluence, adding a coloured background that pops off the page is a great option. Pair backgrounds with a two-column layout to create striking side-by-side sections that naturally draw the eye.
To create background sections in Confluence, install Mosaic (you can try it for free) and then type /background on your Confluence page.

You can make a Background macro any colour you want, making it ideal for injecting your branding into knowledge bases, intranets, and more.
However, if you're using them across multiple pages, constantly hunting down and typing in your brand's specific hex codes can be tedious.
Mosaic's Advanced Edition includes a brand kit that lets you add logos and preset colours to a palette in Confluence. No more copying and pasting hex codes. Just click and go.
Create clearer content in Confluence
With Mosaic, you can enjoy Tabs, Advanced Expand, and Background macros to create tidy sections in an instant. Start your free trial today!


Written by