How to create a Confluence knowledge base: our 6-step guide
Share on socials
How to create a Confluence knowledge base: our 6-step guide

Holly Aspinall
12 December 2023
11 min read


Holly Aspinall
12 December 2023
11 min read
Jump to Section
Jump to section
Step 1: Plan your knowledge base
Step 2: Create your space
Step 3: Add content to your knowledge base
Step 4: Organise your pages
Step 5: Add page links to your homepage
Step 6: Integrate Jira Service Management
Create the best knowledge base with these 4 top tips
Ready to build a Confluence knowledge base that users love? Get creating with our hassle-free guide.
So you're ready to build a brand-new, beautifully designed and totally engaging knowledge base in Confluence. Whether you're creating a customer support space or an informative HR hub, you're just six steps away from a solution that will save time, reduce pressure on support teams, and engage knowledge workers.
🚨 Ready to get building? The below steps are for creating a knowledge base in Confluence Cloud. If you’re a Data Center user, this article might help. 🚨
Step 1: Plan your knowledge base
Before diving into Confluence, it's better to have a clear plan for your knowledge base. This phase is all about laying the groundwork.
Here are three questions to ask yourself:
Here are three questions to ask yourself:
- What information will my knowledge base contain, and who is it for? This could range from technical documentation to HR policies.
- Who will my main audience be? Whether users are tech-savvy developers, HR personnel, or customers, knowing this helps tailor content to their needs.
- How will I structure the knowledge base? Think about main categories and subcategories, but keep it flexible so your knowledge base can grow and evolve.
What should I include in my Confluence knowledge base?
What your knowledge base contains will depend on what you're building – and who you're building it for – but popular features include the following:
- How-to guides
- Use cases
- News
- Documentation
- Support
- Frequently Asked Questions (FAQs)
- Articles
- Team profiles
Step 2: Create your space
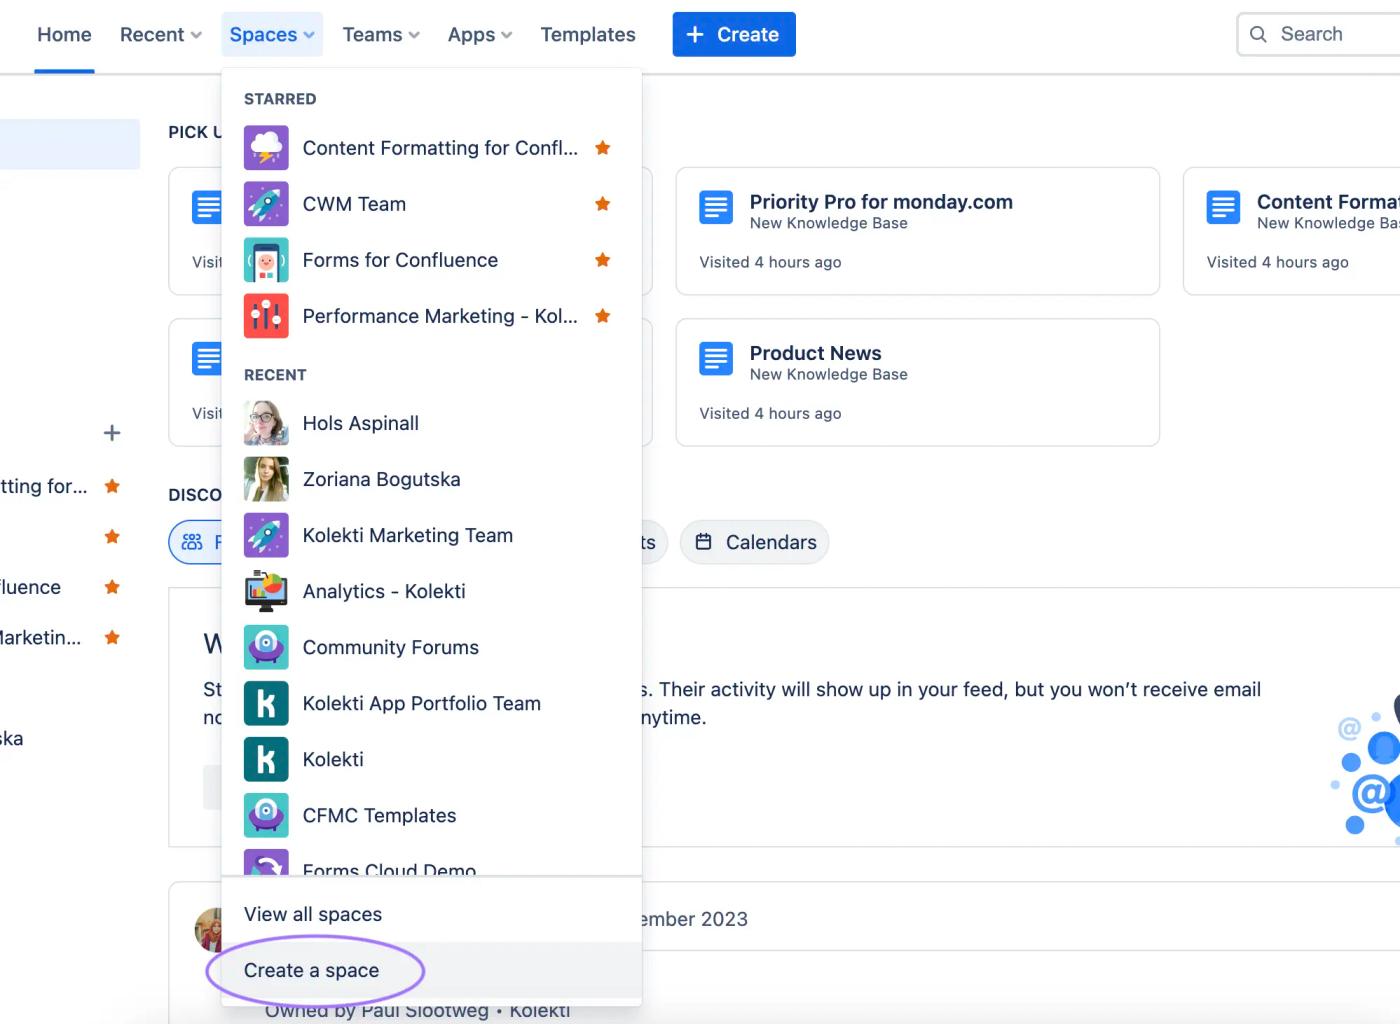
1. Select “Spaces” from the top navigation. Scroll down and click “Create a space”.

2. In the dialog, give your space a name and icon. Select the “Knowledge base space” template or choose "Custom" for a more advanced setup. Finally, define your user permissions and space key, then click "Next".

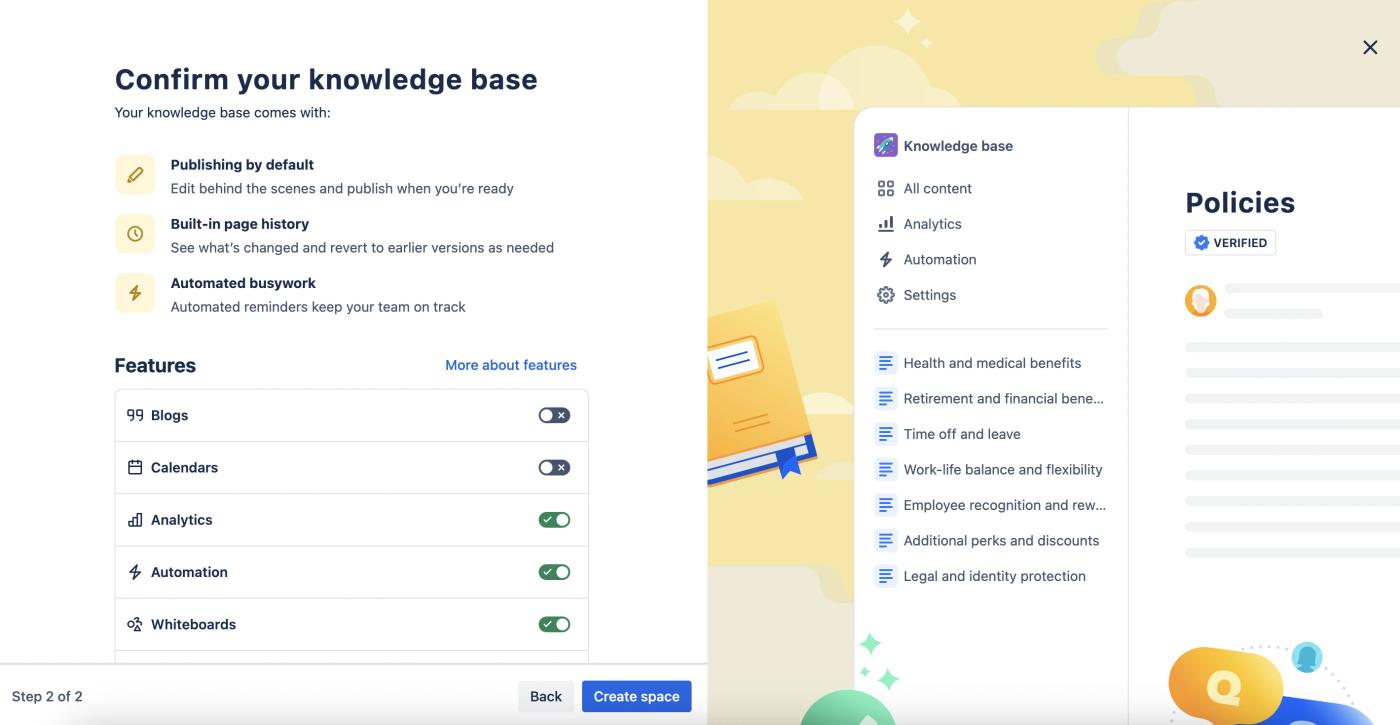
3. Toggle which features you'd like to allow on your knowledge base (such as blogs, calendars, and Confluence analytics). Click "Create space".

⚡️ Pro Tip: While building your knowledge base, you might want to restrict permissions to be visible only to you. Once you're ready to publish the space, you can change the permissions.
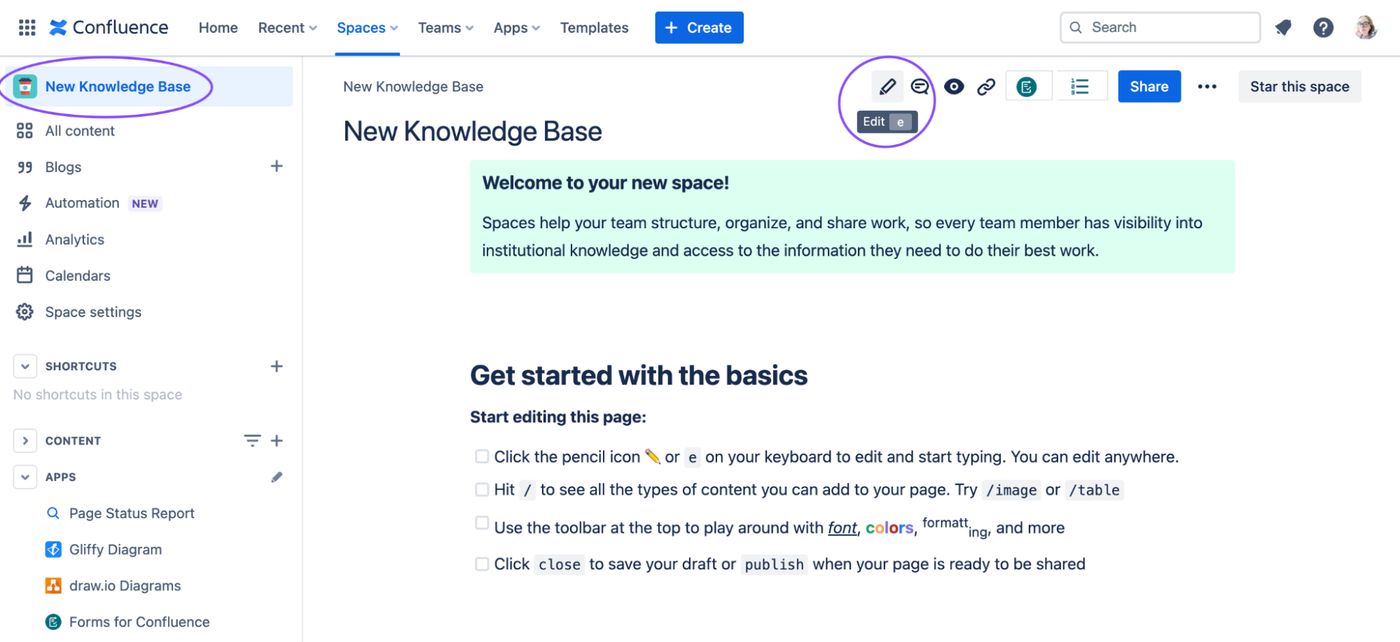
Once you've created your space, you'll be directed to your new space’s overview page. Now comes the fun bit!
Step 3: Add content to your knowledge base
With your space set up, it's time to add some content. If you have your plan from step 1, you should know the initial pages that will live in your knowledge base. Start by laying out a directory/landing page on your homepage, then create your new pages. We’ll add the final links to your new pages later.
Create the homepage
Because your knowledge base homepage is likely the first place users will land, it’s the ideal place for useful information and links to other content.
- On your Confluence space’s overview page, click the pencil icon in the top right corner (or press “E” on your keyboard) to edit your page.
- You can now update your title, remove any template information, and add your homepage content

Your Confluence space’s overview page can be found at the top of the left-hand sidebar.
What should I add to my knowledge base homepage?
What goes on your homepage is up to you, but here are a few ideas:
- A banner that welcomes users to the knowledge base
- A search bar
- Links to other pages (add "#” or the space homepage as a placeholder for now)
- Frequently Asked Questions (FAQs)
- Contact details for when users need extra help
Here's an example of how your knowledge base could look - we’ve used Mosaic: Content Formatting Macros & Templates to help us:

Like the look of this knowledge base homepage? Grab our template!
Create related pages
You'll likely want to add articles to your knowledge base to help keep users updated on news, releases, and guides. To do this, you’ll need to create a new page for each.
- Click “Create” at the top of the page, then click “Page” in the dropdown menu.
- You can either start from scratch from here or use a template.
- To use a template on your new page, you can search in the Templates toolbar on the right-hand side. We recommend using the Troubleshooting and How to article templates for knowledge bases.

⚡️ Pro tip: Make your articles more engaging by adding company branding and using multimedia elements (like videos or diagrams) to make complex information more digestible.
Step 4: Organise your pages
Now you’ve created your pages, you want to make sure users can navigate through them with ease. You can do this by changing your page hierarchy and adding labels to your pages.
Create a hierarchy for your pages
Confluence lets you organise pages in a tree structure, making it for users easier to navigate. Using parent and child pages, you can start to build a content hierarchy. For example, a parent page might be “Product News” with a child page for news related to each product.

Unsure how to do this? Learn how to reorder Confluence pages with our guide.
Use page labels
Page labels are tags that categorise pages and articles, which helps users navigate content by topic and theme. This is especially helpful when creating a knowledge base. Anyone with permission to edit a page can add a label to it. Simply:
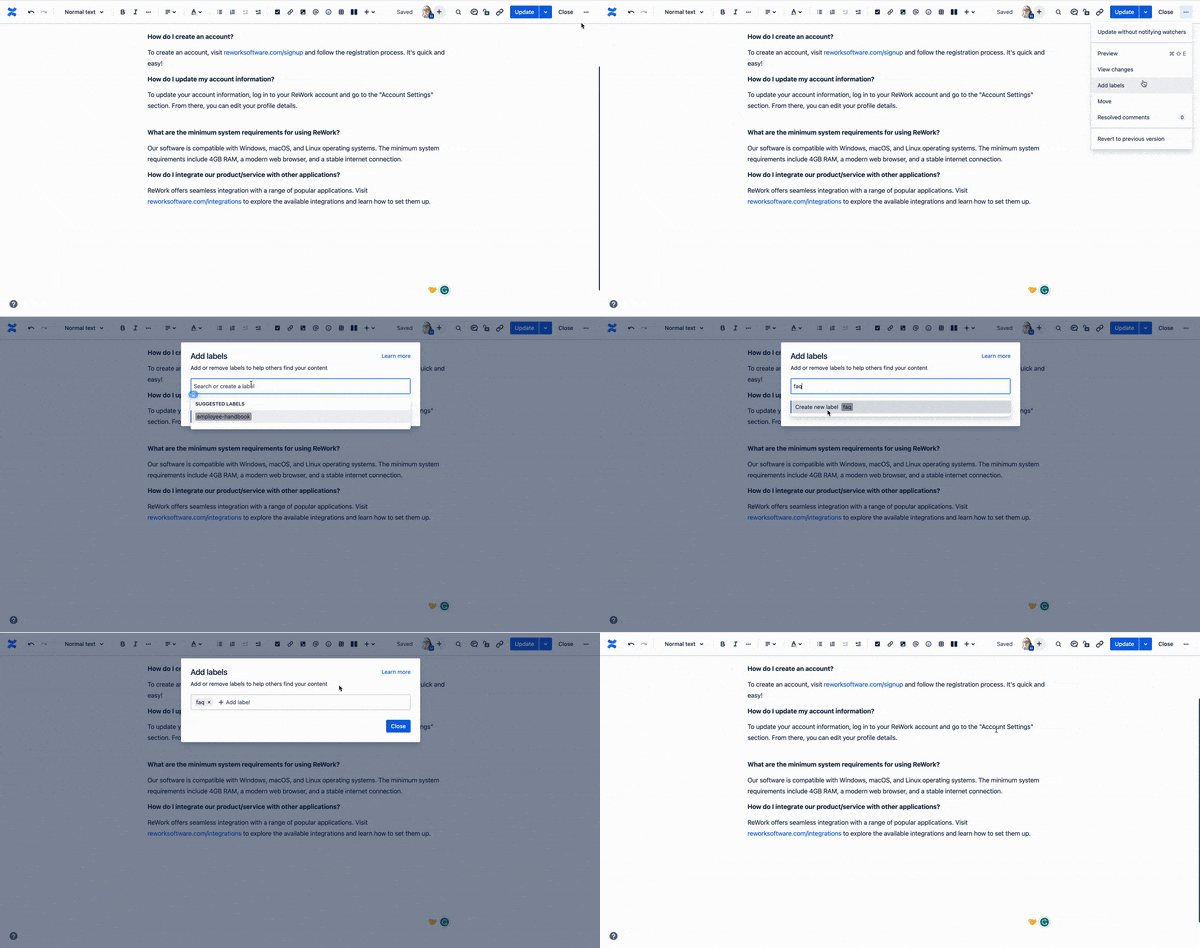
- Click the pencil in the top right-hand corner to edit the page.
- Select the "More actions" menu (...) in the top right corner, then select Add labels or Edit labels.
- Select the label you want to add from the suggested labels or create a new one.

You can add different macros, such as the Labels list macro, to categorise and display labelled content across your knowledge base.
⚡️ Pro tip: Create a guide on best practices for adding and using labels. They can quickly get out of control without restrictions or guidance!
Step 5: Add page links to your homepage
Once you've created your articles and chosen where they'll live, it's time to finish up your homepage by adding links. If you've added content to your homepage already, just replace the ‘dummy’ links with the location of your new pages.
⚡️ Pro tip: Before you start, you might want to note down all your new Confluence page names. This will help you find the right page quickly, and if you've created any new pages that aren't yet mentioned on your homepage, it'll be easy for you to add links!
Step 6: Integrate Jira Service Management
Confluence is even stronger when you integrate it with other tools. If your knowledge base is built for customer or team support, you can amplify its power by linking it to Jira Service Management. This allows your help desk to automatically fetch content from your knowledge base, meaning users can view relevant guides, FAQs, and updates before asking for help. To integrate Jira Service Management, you can read this article from Atlassian
Create the best Confluence knowledge base: our 4 top tips
Tip 1: Make it visual
Your knowledge base needs to engage users or they won't use it. It's that simple. You could visual cues, such as pictures or diagrams, to draw a reader's attention. You could even use a macro toolkit such as Mosaic to structure content and add interactive elements such as cards, tabs, and buttons.
Tip 2: Organise your FAQs
Frequently asked questions (FAQs) help people use your knowledge base as a self-service portal. To help users navigate your FAQs, it’s a good idea to structure them with Confluence Tabs or Expand. These macros will help you separate topics and reduce clutter on your page.
Tip 3: Create accessible content
Make sure your knowledge base is accessible to all users, including those with disabilities. Use clear headings and add alt text and captions to images. You could even add Confluence tooltips to provide hints and extra information for users (e.g. to help explain complicated terminology).
With the introduction of Confluence’s Dark Theme, it’s also important to consider how pages will look on both light and dark backgrounds. Read our guide to creating great content for dark mode in Confluence.
Tip 4: Monitor and improve performance
Finally, don't just set and forget your knowledge base. A good knowledge base should grow and evolve to meet the needs of your users.
Use Confluence's built-in analytics and regularly seek feedback. Can users find what they need? Is the information helpful? With a dedicated survey tool like Forms for Confluence, users can rate and review your content without leaving the knowledge base. These insights can help you iterate and improve your knowledge base, so it remains a valuable resource.
Build your best Confluence knowledge base with Mosaic
Mosaic is the ultimate sidekick for building a knowledge base. Discover why it’s loved by over 13 million users worldwide today.
Written by

Holly Aspinall
Content Marketing Manager
As an experienced Content Marketing Manager, Holly is dedicated to writing valuable, accessible guides that help users understand their tools better and get more out of their workday.
LinkedIn →
LinkedIn →


